Mindful in March Pt.2
Welcome to Part 2 in the guide for the Mindful in March challenge.
 16. Water
Photo by @Prims_playnest


18. Tree

Photo by @themakermum

20. Feather

 23. Leaf


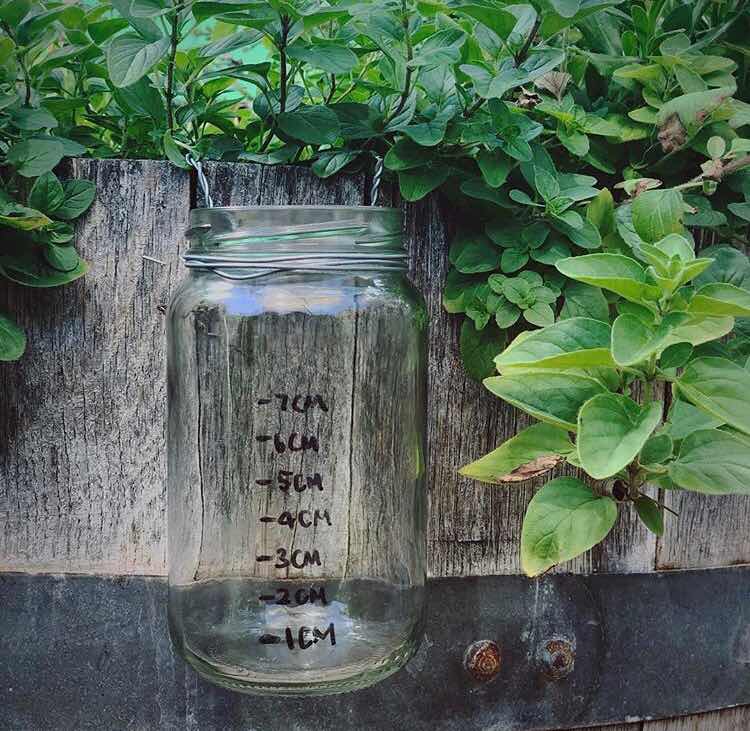
16. Water- DIY Rain Water Gauge - Create a beautiful gauge for your garden to help your little one track the rain fall. A wonderful learning opportunity and activity by @Prims_playnest Head over to her account and look for the post for instructions.
Photo by @Prims_playnest
- Explore a Creek - Creeks are pure serenity. The sounds of trickling water flowing over rocks, waterfall swimming areas in you're lucky. Find your nearest creek and go exploring.
What details make the creek special?
What is your child's favourite part of the creek?
Don't have a creek nearby? Perhaps a beach, rockpools or pond? - Water Tub Sensory Play - Create a beautiful water tub play theme. Rocks, glass pebbles, shells and toy sea creatures. Perhaps dirt, pebbles, leaves and crocodiles?
Let your imagination run wild. - Ocean Layers Jar - You will need a tall glass jar, oil, blue food colouring, and water. Fill your jar 1/3rd of the way with water and add some blue food colouring. Fill the other 2/3rds of the way with the oil. You want to leave a small space between the top and the lid for shaking. Place the lid on tightly and give the jar a shake. Put it down on a flat surface (works best in sunlight) and watch as the colour is separated in layers like the ocean.
Not only educational - this is a great calming sensory jar.
17. Rainbow
- Rainbow Colour Sort - First of get your child to paint a watercolour rainbow. You can add other details for other colours if you wish such as the pink heart in ours. Once it’s dry pair it with a bowl of crystals in the matching colours for your child to sort onto the painting.
- Rainbow Flowers - Get some white flowers and glass jars, cups or small milk bottles. Put a different food colour & water mix in each one and add a flower. Watch over a period of days as the flower petals begin to change colour. You can even try splitting a stem in three and putting each part in a different cup to try a combined single rainbow flower.
- Rainbow Playdough - You can choose to create 6 batches of playdough (see recipe in playdough prompt below) or divide the recipe in half, three times to do half batches of each colour.
Involve your child in finding what they could add to their play dough for each colour and fragrance. If dividing batches, use the water in two separate saucepans to boil ingredients (to infuse colours and fragrances) separately for the doughs, strain each mixture before adding the liquid to the other dough ingredients. If you have plant based powders you want to use, that will work fine too!
Some examples of ones we did are; Red - strawberry, Orange - oranges, Yellow - lemon, Green - mint, Blue - blueberry & vanilla, Purple - lavender.
If your colour isn't too vibrant you can add more plant based food dye.
18. Tree
- Repurposed cardboard trees - Have some cardboard tubes around the house? Cut out and get your child to paint some tree tops (cardboard) and slot them into the top of the cardboard tubes (the trunk). Set up a small world play with them once they are done. This wonderful activity is by @themakermum
Photo by @themakermum
- Bark/Leaf Rubbings - An old but classic activity that's always a fun and interesting experience for children as they explore the differences between textures of bark and shapes of leaves. Grab a journal or some paper with a clipboard and crayons or charcoal, head out for your tree search.
Ask your child to choose the trees they would like to investigate. Do bark rubbings against the tree and look for freshly fallen leaves to rub under your paper. Discuss the differences in the trees as you investigate them. When you're done ask your child which rubbings are their favourite.

- Climbing Trees - A right of passage in childhood, find a tree to climb!
What does your child notice about the tree? What can they see and hear from the tree they are in? Are there any birds near by? What animals can they think of that live in trees?
19. Labyrinth
- Finger labyrinth - You can create your very own finger labyrinth with air dry clay. Check out the tutorial on our blog to see how.
https://deerandfawns.blogspot.com/2018/09/diy-finger-labyrinth.html - Rock labyrinth outline - Roll out some air dry clay and draw in a labyrinth. Let your child place crystals and/or pebbles into the marked lines.
- Labyrinth Walk - Have a search and see if there’s a labyrinth close by that you can walk. If not is there an open area where you can create your own with nature such as branches, rocks, pinecones etc?
Walk the labyrinth into the center focusing on the sounds around you, try to remove any over thinking or worries from your mind. Just focus on the moment and let your soul smile. Once you reach the center, let go of your troubles, visualise leaving them there behind you and begin walking back out of the labyrinth path.
20. Feather
- Feather Mobile - Collect a variety of feathers, some pliable wood such as willow, cord and beads. Weave a circle frame with your pliable wood. Tie your cord to your feather, add beads if your child would like to. Tie them onto the wooden frame. Repeat until your child decides it's finished. Next, tie a loop in the middle of a strand of cord and tie the ends to the wooden frame from the top so you have something to hang it with.
- Feather Painting - A wonderful opportunity to explore art with feathers. Your child can choose or mix some paints and decorate some feathers. Do they like to paint patterns or pictures on them?
Ask them if they would like to try painting a feather and pressing it on a sheet of paper to make a print. - Papercraft Feathers - Cut out some feathers from paper or card and invite your child to paint them with watercolours. Once they dry, ask if they can cut their feathers. If they wish to, they can create a cardboard bird with them afterward.
21. Moon

Photo by @wild.wattle.folk

- Moon Phase Tracker - Create a wonderful dial to help your little ones track the phases of the moon. Activity by @wild.wattle.folk check out her blog for instructions https://wildwattlefolk.com/blogs/lunar/moon-phase-tracker
Photo by @wild.wattle.folk
- Full Moon Magnets - Get some white air dry clay and roll it flat. Using a circle cookie cutter, cut out your moons. Get your child to push craters into the moon with a small pebble, crystal or fingertips. Let the clay dry then your child can paint their moon with watercolours or silver paint. Once dry glue your magnet to the back.
- Exploring Craters on the Moon - Get a round tray or baking tin and fill it a little over half way with sand or moon dough (same as cloud dough). Gather some different sized stones for your asteroids and meteoroids. If you have some small chunks of pyrite - they would make excellent space rocks for the activity.
Place the tray/tin on the ground and get your child to hold their stone out at arm's length above it. What do they think will happen when they drop the stone? Ask them to let go and drop it. What did they notice happened in the tray/tin? They can do this multiple times to make their craters and then remove the stones to reveal the impact marks. Explain to your child that due to the moon having no atmosphere, asteroids and meteoroids are able to collide onto the moon's surface.
22. Pattern

- Stone Patterns - Set up an invitation with rocks, glass stones and/or crystals. Discuss with your child what patterns they think they could make. As you go through different patterns ask your child if they would like to try making a picture out of them. Ask them to tell you about their picture. Were they drawn to particular stones more than others?
- Nature Patterns - Gather some nature treasures outdoors and make patterns with them on the ground, together with your child. Much like the stone patterns, eventuate your patterns into pictures.
- Investigating Patterns in Nature - Get a clipboard, pencil and paper. Go out on the hunt for patterns in natural surroundings. Leaves, feathers, flowers, plants. Have a close look at the details and drawn what patterns stand out the most. Compare the results, did different objects have similar patterns? What pattern was your child's favourite?
23. Leaf- Leaf Prints - Go out and gather some leaves. Paint over the leaves and press them down on rocks, lift them off to reveal beautiful prints. Seal them and use them for beautiful garden decorations or home decor. Paint other leaves and press them down on paper, lift to reveal their prints.
- Leaf Pictures - Collect a variety of leaves, spread them out and glue them together on a piece of paper to create a picture.
- Leaf Art - Collect some freshly fallen leaves and draw or paint some beautiful art on them.
24. Playdough
Recipe base
2 cups plain flour
1 cup salt
3 tbsp cream of tartar
2 tbsp oil
2 cups boiling water
Mix the dry ingredients together then add the oil and boiling water mix and as the dough cools, knead until smooth. This is your basic play dough recipe. You can add essential oils and food dye as well as boil ingredients in your water to infuse fragrances and colours into your playdough mix.
- Nature Island - Set up an invitation for your child with playdough, a variety of nature such as seed pods, gum nuts, leaves, flowers, sticks, bark, shells, crystals.
You can include any extras you'd like such as animal figurines and glass stones.
Provide a wood slice, board or tray for them to create their nature island on. Ask them about their island. What materials are they drawn to in its construction? Do they have a story to tell about their creation?

- Nature Impressions - Similar to nature islands but roll the playdough out and ask your child if they can stamp and roll the nature on the playdough to see what patterns can be made. What items do they think make the best patterns and shapes?

- Ocean Playdough - Create a batch of Sand playdough and blue ocean playdough.Set up an invitation for ocean themed play. Shells, stones, crystals, toy sea creatures. Explore the texture of the sand dough with your child and the smell of the ocean play dough. Join in the play. What kind of underwater land did your child create?
25. Weave
Photo by @littlepinelearners
- Cardboard Nature Weaves - Get a piece of cardboard (you can cut it into any shape you wish), add rubber bands and head out to find some nature that your child can weave through the rubber bands.
If you're unable to head out with it, you can gather a selection of nature prior to starting the activity.
This beautiful nature weaving activity is by @littlepinelearners head over to her IG to see examples of the different shapes she's created for this activity.

Photo by @littlepinelearners
- Circle Cardboard Weave Artwork - Cut out a cardboard circle, then make little cuts all the way around the outside, evenly spaced out. Wrap yarn through those grooves, overlapping in the middle as you turn the circle until you are back to the start, tie it off in the center at the back.
Get your child to select their first yarn and tie it on in the middle. Get your child to start weaving it from the center. They can use as many different yarns as they'd like. Are there particular colours that they are drawn to? Once they get to the outside, tie the end and hide the knot underneath the weave or you can create a loop to hang the weave before you make the knot.
Another lovely option is to attach it to the top of a stick like a flower - you could even add cardboard leaves. - DIY Nature Weaving Frame - Create a gorgeous outdoor nature weaving frame for your children (or even yourself) to get creative with and explore. This wonderful activity is by @mothernatured, head over to her blog for the tutorial.
https://mothernatured.com/nature-crafts/backyard-nature-weaving-frame/

26. Sand


- Create a Zen Garden - Set up an invitation for your child to create their very own zen garden. A Thrifted wooden bowl or tray that isn't too shallow will work - it doesn't need to be too big. You will need fine grain sand (craft sand won't work well), polished stones or crystals, little ornaments if you wish, flowers. Any little decorations you think your child might like. You can buy zen garden rakes or attempt making your own with sticks and glue. Find a special place for their zen garden to live.
This is a beautiful resource for calm, mindful meditation.
- Sand Sculptures - What would your child like to build? Engage in a wonderful activity together of constructing with sand. Are there objects around that they could use to add details to the creation? What do they like about the creation?
If they want to destroy the creation afterward as many kids like to, join in but ask them first!

- Enchanted Castles - If you have access to a beach, dig a hole in the wet sand to create a 'pool'. Start piling up the dug sand and then grab handfuls of sand from the pool section and squeeze your fist gently to encourage the 'dripping' effect on your castle.
You can create little drip peeks, dig little caves etc. Continue until you feel it's completed. Decorate with bits of broken shells, full shells, driftwood, leaves, feathers. Whatever you can find. Enjoy playing in the beach 'pool' by your enchanted castle.
27. Calm

- Calm Corner - Create a beautiful calming area for your child that can be a meditation space, a place for them to sit and relax or somewhere to sit and talk through feelings when they're feeling overwhelmed.
Some things we have used in ours are cushions and a few cuddly toys, a bell, a small bowl of larger sized crystals, some storybooks and a handmade blanket. You basically want to create a comfortable place where they feel safe to open up. Sensory baskets are another great idea.
- Calming Sensory Jar - Fill an empty jar with different materials and seal it. When your child is feeling overwhelmed, offer them their calming jar to explore the contents and help them feel grounded.
Content ideas could be sticks, rice, gumnuts, dried flowers, seeds, seed pods, driftwood, bells, buttons, dice, small sturdy shells, small toy animals. - Calming Strategies Wheel or Poster - Create a wheel of strategies for your child to choose from to help them calm down when feeling overwhelmed. If you'd prefer to make a poster, get a sheet of card to put the strategies on.
Strategy ideas could be..
-Holding up fingers, pretending that they are candles. Taking a deep breath and blowing them out, one at a time.
-Use a calm down jar
-Count slowly to 10
-Sing a song
-Colour or draw
-Dance
-Read a story
-Think happy thoughts
28. Autumn
- Pinecone Fairies - Collect pinecones, acorn caps and beautiful pressed autumn leaves. You can seal your pressed leaves in mod podge or beeswax. Let your child select and (if they wish) paint their pinecones. Next glue some wool on top of a wooden bead for hair. Glue an acorn cap on top of the hair, then glue the head to the pinecone body. Cut some twine and tie a knot at the end pieces. Glue that knot to the back of the pinecone at the base of the head. This provides a loop for your child to make their fairy fly. Next glue the leaves on the back of the pinecone. Faces are optional

- Autumn Lantern - Collect some beautiful autumn leaves with your child and press them. Get a glass jar, some mod podge, twine - whatever you'd like to decorate with. Ask your child to paint mod podge on the jar and carefully place the leaves on top. Apply a coat of mod podge on top of the leaves as well to stick and seal them. If you'd like to, you can wrap some twine around the top of the jar for decoration. Add your candle and your lantern is all ready for autumn celebrations.
You can make a lantern for each season. - Autumn Crown - Create an autumn crown with pliable wood into a hoop and attach leaves, acorn caps, whatever you'd like to create your seasonal crown.
29. Winter

30. Spring
- Ice Light Catchers - Freeze a disc of ice (placing an object in to leave a hole for your rope) with dried orange or flowers etc - whatever you'd like for decoration. Once frozen, take it out of the freezer, tie your rope through and hang it outside. Watch the light shine through the beautiful decorations.
- Ice Sensory Play - Pour water in a baking tin and freeze. Prepare some ice cubes as well, you can add things into the cubes for extra sensory detail such as dried flowers, gumnuts, pebbles etc. Set up an invitation for your child with the tin of ice, the cubes and coconut for snow.
- Resist Snowflake Art - Using a white crayon or oil pastel, ask your child to draw a snowflake on a sheet of paper. Then using watercolours ask them to paint over the paper, exploring how the crayon or pastel resists with the watercolours to reveal their snowflake amongst the paint in a magical way.
30. Spring
- Build a Nest - Set up an invitation with a range of materials for your child to try creating their own nest. Material suggestions, pieces of willow, twigs, twine, scrap material strips.
Assist them if needed in creating a frame for their nest and weaving materials through. You could also try a paper bag nest (can be found in our IG feed) by rolling a paper bag sides and attaching twine with glue.
- How does your Garden Grow? - This is one of my favourite activities we've done, exploring the lifecycle of plants. Get your child to create mixed media flowers on cardboard or use real flowers.
Create little polymer clay seeds and sprouting seeds (or use real ones if you have any). Use a green pipecleaner (chenille stick) to create a long sprouted, growing plant. Make brown and green playdough. Set up an invitation with all the elements present for your child to create their garden. You can discuss the lifecycle of the plant during the process and play. - Seed Bombs - Gather some paper to recycle and shred it. Soak the paper in water then put the paper into a blender, add a little water and blitz. Put your pulp into a colander and drain the water out, then transfer into a bowl. Get your child to add the seeds and combine them with the pulp, by hand.
They can be rolled into balls, pushed flat, shaped with cookie cutters. Whatever you'd like. Remove excess water with some cloth or towel and allow to dry completely. Plant in your garden or gift to loved ones.
31. Summer

A big thank you to all my contributors in my first Mindful in March challenge. If the response is well, I will look forward to doing this annually. Thank you to everyone joining in. This challenge was inspired by the positive response we continue to get in the things we do and way we do them. This is our way of bringing some of that to you!
I hope you have a lot of fun and find something special to take from it at the end.

- Create a Coconut Bowl - See our tutorial on how to work with your child to create your very own coconut bowl. https://deerandfawns.blogspot.com/2018/03/sustainable-coconut-c-lesson.html
- Mud Faces - Get your child to dig a few inches into the ground, to collect dirt that will make the best mud mix for your faces. Have them put it in a small bowl, then pour in water a little bit at a time and mix to form a thick pasty consistency. Provide them with a bowl of nature and get them to put handfuls of mud on a tree trunk in the same area to form their face.
Next it's time to add the face details. Let them decorate with items from the bowl of nature. Let your mud face dry and admire your new whimsical friend. - Summer Wind Wand - Using some pliable wood, weave a circle hoop (about the size of a tambourine, no larger. Get your child to choose some colourful warm summer ribbons. Cut them at different lengths between 30-50cm and tie them onto the hoop spaced out evenly, leaving a blank area for a hand to grip. Once completed take your wind wand outside. Run and dance around with it.

A big thank you to all my contributors in my first Mindful in March challenge. If the response is well, I will look forward to doing this annually. Thank you to everyone joining in. This challenge was inspired by the positive response we continue to get in the things we do and way we do them. This is our way of bringing some of that to you!
I hope you have a lot of fun and find something special to take from it at the end.


Comments
Post a Comment